Using Edge Detection
When using edge detection for part matching, the sensor compares a model that you must create from a previous scan to a "target" (one of the parts you want to match to the model).
In the data viewer, a model is represented as a yellow outline. The target is represented as a blue outline. If the part match quality above a minimum user-defined level, any measurements configured on the Measure page are applied.
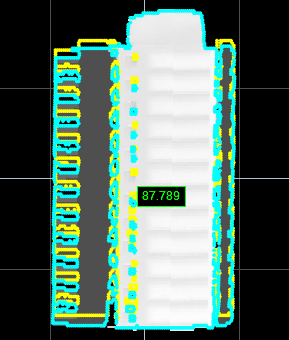
Model (yellow outline) and target (blue outline).
Part match quality is 87.789%, which is greater
than the minimum set by the user, so the parts match.
When you create a model, the sensor runs an edge detection algorithm on either the heightmap or intensity image of a scanned part. The resulting model is made up of the detected edge points. The scan used to create the model should be of a reference (or "golden") part to which all other parts will be compared.
After the model has been created, you optionally modify the model by adjusting the sensitivity (how many edge points are detected), or selectively remove edge points from the model, to improve matching.

|
Models are saved as part of a job. |
Once you have finished modifying the model, you can also modify target sensitivity, which controls how many edge points are detected on the subsequently scanned targets that will be compared to the model; the same edge detection algorithm used for creating models is used to compare a model to a part.
Typically, setting up edge detection to perform part matching involves the following steps:
- Scan a reference part (you can also use replay data that you have previously saved).
- Create a model based on the scan (using either heightmap or intensity data).
- Adjust the model (edge detection algorithm sensitivity and selective removal of edge points).
- Scan another part typical of the parts that would need to match the model.
- Adjust the target sensitivity.
- Set match acceptance level.
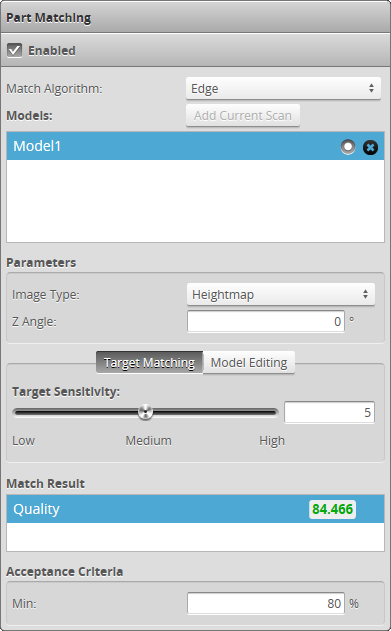
Part Matching panel showing Target Matching tab
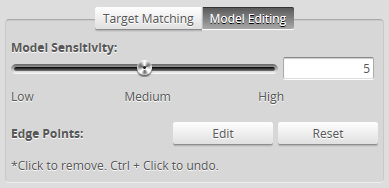
Model Editing tab on Part Matching panel
The following settings are used to configure part matching using edge detection.
| Setting | Description |
|---|---|
| Match Algorithm | Determines which algorithm the sensor will use to attempt a match. |
| Image Type |
Determines what kind of data the sensor will use to detect edges and therefore for part matching. Choose this setting based on the kinds of features that will be used for part matching: Heightmap: Surface elevation information of the scanned part will be used to determine edges. This setting is most commonly used. Intensity: Intensity data (how light or dark areas of a scanned part are) will be used to determine edges. Use this setting if the main distinguishing marks are printed text or patterns on the parts. The Acquire Intensity option must be checked in the Scan Mode panel on the Scan page for this option to be available. |
| Z Angle | Corrects the orientation of the |
|
Target Sensitivity (Target Matching tab) |
Controls the threshold at which an edge point is detected on the target's heightmap or intensity image. (The "target" is any part that is matched to the model and which will subsequently be measured if the match is accepted.) Setting Target Sensitivity higher results in more edge points. Setting it lower results in fewer edge points and results in higher performance. Use this setting to exclude noise from the detected edges and to make sure distinguishing features are properly detected. The level of this setting should generally be similar to the level of Model Sensitivity. |
|
Model Sensitivity (Model Editing tab) |
Controls the threshold at which an edge point is detected on the heightmap or intensity image used to create the model. Setting Model Sensitivity higher results in more edge points. Setting it lower results in fewer edge points and results in higher performance. Use this setting to exclude noise from the detected edges and to make sure distinguishing features are properly detected. The level of this setting should generally be similar to the level of Target Sensitivity. Changing this setting causes the edge detection algorithm to run again at the new threshold. If you have edited edge points manually (removing them selectively), those changes will be lost. For more information, see Modifying a Model's Edge Points. |
|
Edge Points (Model Editing tab) |
The Edit button lets you selectively remove edge point that are detected by the edge detection algorithm at the current Model Sensitivity setting. For more information, see Modifying a Model's Edge Points. |
| Acceptance Criteria |
Determines the minimum quality level of the match as a percentage value. |
Part rejected: Quality result is less than Min
To run part matching, simply make sure that the Enabled option is checked on the Part Matching panel when the sensor is running. Any measurements that are added and configured on the Measure page will be applied to parts if a part match is accepted, regardless of the part's orientation (a successfully matched part is rotated to match orientation of the