Single Exposure
The sensor uses a fixed exposure in every scan. Single exposure is used when the target surface is uniform and is the same for all targets.

|
See the note in Exposure for important information on potential discrepancies between Max Frame Rate and the speed reported in the metrics area.
|
To enable single exposure:
|
1.
|
Place a representative target in view of the sensor. |
The target surface should be similar to the material that will normally be measured.
|
3.
|
Expand the Sensor panel by clicking on the panel header or the  button. button. |
|
4.
|
Click the button corresponding to the sensor you want to configure. |
The button is labeled Top, Bottom, Top-Left, or Top-Right, depending on the system.
Exposure is configured separately for each sensor.
|
5.
|
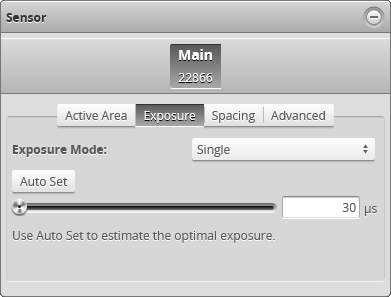
Click the Exposure tab. |
|
6.
|
Select Single from the Exposure Mode drop-down. |
|
7.
|
Edit the exposure setting by using the slider or by manually entering a value. |
You can automatically tune the exposure by pressing the Auto Set button, which causes the sensor to turn on and tune the exposure time.
|
8.
|
Run the sensor and check that laser profiling is satisfactory. |