Creating a Section
Before you create a section, you should first scan a target in Surface mode to create a surface on which you can create the section. You can use either live data or recorded data.
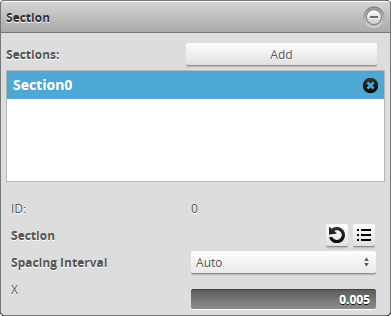
After creating a section, the following settings are available:
| Setting | Description |
|---|---|
| Spacing Interval |
Determines the space between the points of the extracted profile. Auto: The highest resolution, calculated using the X and Y resolution of the scan. Custom: Lets you set the spacing interval by using a slider or setting the value manually. |
| Section |
Lets you manually set the X and Y coordinates of the start and end points of the section. Setting the coordinates manually is useful if you need to create a section that is perfectly horizontal or vertical. For example, to create a horizontal section, copy the Y value of either the start or end point to the other point's Y field. You can reverse the start and end points by clicking the To reset the start and end points to their initial values, click the |
 button.
 button.
To create a section:
| 1. | On the Scan page, in the Scan Mode panel, click Surface. |
| 2. | On the Model page, in the Section panel, click Add. |
You may need to click the  button to expand the panel.
The sensor creates a section on the surface.
| 3. | Rename the section if you want. |
| 4. | Move the section and adjust the start and end points of the section to extract the desired profile. |
You can move or adjust the section graphically in the data viewer, or you can manually adjust the X and Y coordinates of the section.
| 5. | (Optional) Adjust the Spacing Interval. |
After you create a section, the profile measurement tools become available in the Tools panel on the Measure page. If you have created more than one section, you must select it in the tool. For more information on profile measurement tools, see Profile Measurement.
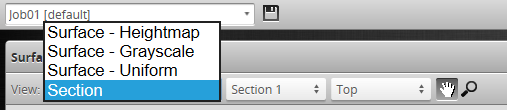
The sensor also adds a Section option to the View drop-down above the data viewer, which lets you view an extracted profile, as well as a section selector drop-down for cases where multiple sections are defined.
Sections are also added to the Stream drop-down in Profile and Feature tools.
If parts are not consistently oriented in the same way from scan to scan, you can use part matching to correct their rotation, if the entire part is visible in the scan. Parts will then be consistently oriented, and sections will fall on the same area on each part. You can also use anchoring to ensure that measurements are consistently placed on a part.